Hi everyone! I'm Jenni, just popping over from DisheveledMommy to share with you guys a really fun mom & kids activity.
This afternoon Crystal had posted on Facebook that she was going to try baking cookies in her HOT car, and posted a link to a site with pizza box cookers as well. Those reminded me of the shoebox hotdog cookers we used to make in school growing up in Phoenix. While it was only 102 (ha!) here today, and not the 110+ we had growing up, I figured it'd work. I bet it was only 102ish while we were still in school ;-)
I'm going to give you more of a "process" type instructions, rather than set directions, so you can easily adapt it for the supplies you have on hand. No one wants to run to the store, kids in tow, in this heat!
First you will need a shoebox, or similarly sized box with the flaps cut off. I have a slew of these boxes, but could not find an empty shoebox! They were all filled with treasures, socks, extra toiletries, etc. So I grabbed one of my small Amazon shipping boxes. Nice & sturdy. Plus, I already had cut the flaps off because I was going to cover it in contact paper to store my make up palettes in. (I now have a basket for them...)
Ok, so we have a box (preferably from our stash, ) now we need to grab some aluminum foil, some plastic wrap, (or plexiglass...) a gluestick just-in-case, some tape, and a few wooden skewers. I was super lucky & had a small bit of plexiglass just the right size.
Optional: a paper towel tube to place under the dogs in case they drip, cut in half, then each half cut in half longways in a curved fashion. Cover with foil. (More reflection!) The little one loved doing this!
Cover the inside of your box with foil, securing with tape around the outside edge, using a bit of gluestick if needed. I also went around my plexiglass with some electrical tape in case the edges were sharp.
Mark with a pen in about equal intervals along one long side of your box 2-4 places for skewer holes.
Poke these with the tip of a screwdriver and slide the skewers through. Poke the opposite side with the skewer. I didn't go through the other side with the screwdriver so they'd be snug.
Place the "drip pans" under each skewer.
To use, pull the skewers halfway back out the holes, tilt up and skewer a hotdog. Slide the dog down to the middle, and place the skewer back into the hole. When your skewers have been dogged, cover tightly with plastic wrap, or your plexiglass "lid" and place into direct sunlight. It may take a couple-few hours to cook, but it's fun!
You may need to place a rock under the cooker to get a good angle, adjust as the sun moves. You may also have to tape your lid a little, as I did today! (Definitely tape it if using plastic wrap!)
Running a buisness around carpools, basketball games,running a house, and trying to get fit.
Showing posts with label Crafts. Show all posts
Jul 16, 2011
Oct 10, 2009
Pumpkin People. :)
Sep 1, 2009
Diaper Cake Time
May 30, 2009
Make your own scented candles!
If you're like me you've spent your fair share on those great smelling, yet some what costly scented candles and/or tarts.
I'm all for supporting work at home moms looking to make extra money by making and selling their own scented candles, however what if you can't afford those costly candles and tarts?
I recently purchased soy candle wax from Micheal's for $20 (they carry less expensive wax as well). I also purchased several 1 oz. bottles of candle fragrance (you can find these on eBay) for about $1.00 each. If I've estimated correctly, I should be able to make 25 small candles for less than $25!!

Following the directions provided on the wax box, I melted my wax in the microwave and slowly poured it into my previously used, but clean candle tins. I added the appropriate amount of fragrance and left it to harden.
It takes approximately 1-2 weeks for the candle (or in my case tart) to cure. They smell amazing and were super easy to make! They're now ready to rest on my candle warmer and scent my home!
I'm all for supporting work at home moms looking to make extra money by making and selling their own scented candles, however what if you can't afford those costly candles and tarts?
I recently purchased soy candle wax from Micheal's for $20 (they carry less expensive wax as well). I also purchased several 1 oz. bottles of candle fragrance (you can find these on eBay) for about $1.00 each. If I've estimated correctly, I should be able to make 25 small candles for less than $25!!
Following the directions provided on the wax box, I melted my wax in the microwave and slowly poured it into my previously used, but clean candle tins. I added the appropriate amount of fragrance and left it to harden.
It takes approximately 1-2 weeks for the candle (or in my case tart) to cure. They smell amazing and were super easy to make! They're now ready to rest on my candle warmer and scent my home!
Aug 28, 2007
Get ready for Christmas early this year

I am getting prepared for Christmas. Yes, I know it is only August but I like to get an early start. I am a big fan of Christmas Shopping all year. This allows me to spend the holiday enjoying my family instead of fighting holiday crowds.
1. Go ahead and request a list from your family or decide how you plan to do the exchange this year. You can buy for kids only, draw names, or bring one gift each and play a game.
2. Every time that you go shopping ask for a free gift box. Even if you do not need it now you can save them up to use at Christmas. If you do not have to buy them it saves you money.
3. Start buying small items to make gift baskets. I am a big fan of gift baskets. I already have a box full of items purchased to make gift baskets this Christmas. The possibilities are endless... but that is another blog.
4. Start sending after free samples. They make great stocking stuffers. It is best to start as early as possible to allow time to receive them.
5. Buy your Christmas cards. If you are like me you bought them last year right after Christmas when they were marked down 75%. If not get the bought now. Also get your list together of who you need to send one to.
6. If you plan to give homemade gifts get started making them.
7. If you have the pantry space start picking up a few things that you will need for cooking. You can buy things like canned pumpkin, condensed milk, vanilla, spices, and etc early. This way you do not have a huge grocery bill right before Christmas.
1. Go ahead and request a list from your family or decide how you plan to do the exchange this year. You can buy for kids only, draw names, or bring one gift each and play a game.
2. Every time that you go shopping ask for a free gift box. Even if you do not need it now you can save them up to use at Christmas. If you do not have to buy them it saves you money.
3. Start buying small items to make gift baskets. I am a big fan of gift baskets. I already have a box full of items purchased to make gift baskets this Christmas. The possibilities are endless... but that is another blog.
4. Start sending after free samples. They make great stocking stuffers. It is best to start as early as possible to allow time to receive them.
5. Buy your Christmas cards. If you are like me you bought them last year right after Christmas when they were marked down 75%. If not get the bought now. Also get your list together of who you need to send one to.
6. If you plan to give homemade gifts get started making them.
7. If you have the pantry space start picking up a few things that you will need for cooking. You can buy things like canned pumpkin, condensed milk, vanilla, spices, and etc early. This way you do not have a huge grocery bill right before Christmas.
Labels:
Christmas,
Crafts,
Frugal Living,
Homemade Gifts,
Kid Stuff,
Shopping Tips
Aug 21, 2007
How to make silly putty or goo.
Aug 17, 2007
How to make a wax dipped stuff animal.
Have you seen the yummy smelling wax dipped bears?
They sale them at craft fairs and stores for $15 to $30. This is the time of year to get ready for those craft fairs. This would be a great Craft for a wahm or sahm to make some extra money for the holidays.
They are quite simple to make yourself with a few supplies and a little time.
Stuffed Teddy Bear or other animal
1 lb. wax
1.5 oz fragrance oil
Double boiler or crock pot
Thick Rubber Gloves w/ Lining
Drying Rack
2 Forks
Tongs
Blow dryer
I used a large pot with water in it with a tight fitting bowl set down inside of it.


Use tongs to lower in your stuffed animal very slowly. Roll it around using the tongs.

Be careful the wax is very hot.

Any type of cooling rack will work.

Fluffing the stuffed animal is the key to a nice looking wax dipped stuffed animal. Do not worry if you see the wax start to dry and flake, we can fix this later.

If you feel that you have messed to the point that the hair dryer will not help just redip the bear and start over.

It is best to allow it to dry overnight.

Tips-
Jointed bears seem to work best.
Longer haired bears work better than short hairs.
The most common sizes used are from 6" to about 10".
Better quality stuffed animals will hold up better to hot wax... some cheaper glued bears can fall apart. The glue will melt on some of the cheaper ones causing them to fall apart.
Try to use oils that are clear or very light in color on white or pastel bears.
For extra scent pour concentrated fragrance oil into the inside of the bear before dipping.
Do not set waxed bears on wood surfaces as the oils in the wax can stain the wood!
Average 6 - 10" bears sell for anywhere from $15.00 to $30.00 retail!
The bears will naturally lose scent over time. Refresh them by sprinkling with refresher oil or warming them with a blow dryer.
They are not toys and should be kept out of the reach of children.
Try using colored wax on matching colored bears for a dramatic look.
If your wax bear is dusty, clean him with a blow dryer on the cool setting.
Do yu really want one but are not sure you are ready to make it? Check out the super cute ones at Apple Blossom Candles
These photos belong to http://www.mrssuziehomemaker.com/ and are not to be reproduced without written permission from the webmaster.
They sale them at craft fairs and stores for $15 to $30. This is the time of year to get ready for those craft fairs. This would be a great Craft for a wahm or sahm to make some extra money for the holidays.
They are quite simple to make yourself with a few supplies and a little time.
Stuffed Teddy Bear or other animal
1 lb. wax
1.5 oz fragrance oil
Double boiler or crock pot
Thick Rubber Gloves w/ Lining
Drying Rack
2 Forks
Tongs
Blow dryer

I used a large pot with water in it with a tight fitting bowl set down inside of it.


Use tongs to lower in your stuffed animal very slowly. Roll it around using the tongs.

Be careful the wax is very hot.

Any type of cooling rack will work.

Fluffing the stuffed animal is the key to a nice looking wax dipped stuffed animal. Do not worry if you see the wax start to dry and flake, we can fix this later.

If you feel that you have messed to the point that the hair dryer will not help just redip the bear and start over.

It is best to allow it to dry overnight.

Tips-
Jointed bears seem to work best.
Longer haired bears work better than short hairs.
The most common sizes used are from 6" to about 10".
Better quality stuffed animals will hold up better to hot wax... some cheaper glued bears can fall apart. The glue will melt on some of the cheaper ones causing them to fall apart.
Try to use oils that are clear or very light in color on white or pastel bears.
For extra scent pour concentrated fragrance oil into the inside of the bear before dipping.
Do not set waxed bears on wood surfaces as the oils in the wax can stain the wood!
Average 6 - 10" bears sell for anywhere from $15.00 to $30.00 retail!
The bears will naturally lose scent over time. Refresh them by sprinkling with refresher oil or warming them with a blow dryer.
They are not toys and should be kept out of the reach of children.
Try using colored wax on matching colored bears for a dramatic look.
If your wax bear is dusty, clean him with a blow dryer on the cool setting.
Do yu really want one but are not sure you are ready to make it? Check out the super cute ones at Apple Blossom Candles
These photos belong to http://www.mrssuziehomemaker.com/ and are not to be reproduced without written permission from the webmaster.
Aug 4, 2007
Cute way to recycle old carpet
We are currently in the process of laying tile in our kitchen and bathroom. That meant a lot of carpet pieces. I was thinking about ways to recycle it when I thought about my Grandmother. She loves to work in the garden and could use a new knee pad.
I took a small piece and cut it to the size that I wanted using a box knife and painted it with acrylic craft paints.
May 18, 2007
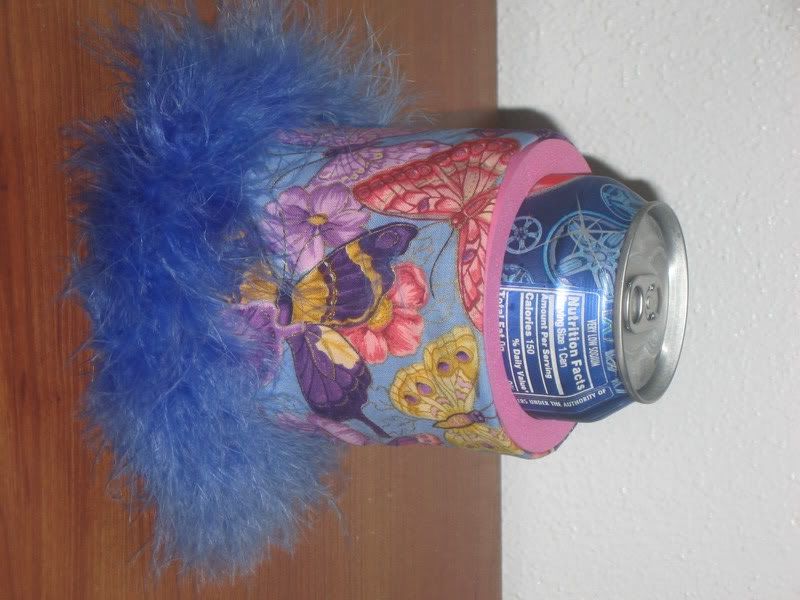
Cute Koozie

If you are looking for a cute gift idea make them a decorated koozie. Make one as a graduation gift using their college colors or college fabric. These cost under $3 to make and people love to get them as a gift.
To make one -
1. Fold under the top edge of a piece of fabric cut to fit around the koozie. It can be a little to long at the bottom. You can trim that off later.
2. Hot glue the fabric around the koozie and trim off any that is hanging on the bottom.
3. Glue a strip of feathers or other decorative trim around the bottom.
If you make one send us a picture and we will put it here on Suzie Homemaker. :) Send them to mjlampe@pld.com
Subscribe to:
Posts (Atom)